Sunday, September 16, 2012

White on White

I have fallen in love.......white on white!!!  I found a layout on pinterest of a baby layout using white on white and just had to make my version of that.  I am going to use this layout for a black and white photo of my hubby and I taken by my friend and professional photographer extraordinare!  I'm going to put it in a display case as the flowers are quite bulky and wouldn't fit very well in a scrapbook.  My art on display!


I love it.....so elegant!!!  I used my cricut a LOT for this particular layout.  I used the Sweetheart cartridge for the big heart and than ran it though my cuttlebug to add some swiss dots.  I used Cindy Loo for the swirls and Flower Shoppe for all of the amazing flowers.  The bracket border was made using Elegant Edges.  All of the leaves were made from a punch that I have had forever but I'm sure you could use a number of punches or cartridges to find ones that you like.  I also added stickles to the flowers to give them a little shimmer. 

I used black cardstock as a border around the entire page (see the cheater method from my tinkerbell post) and a small black border behing the photo mat just to give it some emphasize.

I hope you enjoy.....I know that I LOVED making it!  What a great wedding gift this would make!

Until next time.....

Happy Crafting!

Friday, September 14, 2012

Pinterest

I just signed up for Pinterest a few days ago......and wow.....I had no idea how many card making ideas I would find there!  If you have had a chance to sign up and would highly recommend checking it out!  I have pinned numerous cards to my board for inspiration and a little scraplifting.  Here are three cards that I scraplifted.....


These are almost complete replicas of the ones I saw on Pinterest and although I don't know for sure who created them they did a beautiful job and I couldn't wait to try my own!  It has inspired me to go with a more simple look on cards and to make sets of cards to give away as gifts this Christmas.....maybe they will inspire you!  And check out pinterest!  There are soooo many ideas waiting to be found!

Until next time

Happy Crafting!

Tuesday, September 11, 2012

Tinkerbell Layout

So with so many projects hanging over my head I have decided to dedicate some time to finishing them.  Does that ever happen to you?  I get bored with one and start another.....and it just keeps happening.  This past weekend i sat down and decided that I was going to finish the princess album that I started for a christmas gift.......last christmas!

By Sunday at 2pm I was finished!  With a sigh of relief I thought I would share this layout that I made featuring cuts from the TinkerBell and Friends cartridge.  I just fell in love with it and hope you do to!


I posted this second pic to show you how I save on paper.  When I am only using cardstock as a border around the main pattern paper I always cut an 11" square out of it.  I then use that for photo mats and embellishments......paper saver!  This is also great when you only have so much of a certain colour....just a way to stretch those pennies!

Hope you enjoyed and until next time....

Happy Crafting!

Monday, September 10, 2012

Craft Nook Card Swap #2

My local craft store is hosting another card swap and although I most certainly do not need any more cards around here I just can't help but participate.  I just love seeing what all of the ladies are up to and what there art work looks like.  Not to mention that it gives me ideas for my card making as well.  During the last card class I made a confession that I never thought that I would.  I, Tammy Orr, have become a card maker.  I used to always think that card making was a waste of time as cards just get tossed after the occassion......yet here I am.....a full fledge card maker!  Not sure when or how it happened but it did!

So here is the card that I came up with for the swap this time around.....the only requirement was that I had to use some type of border punch....


I found a tutorial online on how to make the side step card and once I made one the rest was easy.
click here to see the instructions on how to make the card base:
Side Step Card Base Tutorial

I used my trusty cricut to create the pumpkins and the scarecrow.  The pumpkins are found on Create a Critter and I "hid" the faces on my gypsy before cutting them.  The scarecrow is found on celebrate with flourish and I used a Peachy Keen face stamp for his face.  I used the fisckers grass border punch to create the grass. 

I hope the ladies like it......I sure had fun making them!

Until next time,

Happy Crafting!

Sunday, August 5, 2012

Card Swap

Hello all my crafty friends!  I hope everyone has had some time to let their creative juices flow freely.  I am preparing for a trip to Nova Scotia and have been crafting my heart out to try and complete all of the projects that I need to finish before I go!  I am making a couple of chipboard albums to give away while I am there plus a card swap that I signed up for.......YIKES!  Thankfully I am just about finished all of them and thought I would share the card that I made for the swap as I am soooo proud of it.  The ladies at The Craft Nook said that we should try to make some of our best work and I felt like I did just that.  I know we all struggle a bit when it comes to masculine type cards so I opted to try one and hopefully inspire the ladies in the card swap when they receive it!


This Card is a standard 5.5" x 4.25" size and is using the Tim Holtz distess inks to create the background

I use a piece of post - it note and punched a 1" circle ensuring that part of the sticky strip was in the circle to hold it in place as a mask for the moon.


Inks used: broken china, faded jeans, chipped sapphire, walnut stain, pine needles

Using the Broken China I blended it down approximately half way down the card.  I used the Faded Jeans and blended on top of the broken china until there was only .75" of broken china showing.  I then went over the top 1" of the card using Chipped Sapphire.


I then took scrap cardstock and ripped it up to use as a mask and creating the mountain ranges.  I placed the mask just above the broken china and blended in the walnut stain until it was quite dark and approximately 1" below the broken china.  I then moved the mask (or used a different shaped mask) and place it slightly higher that the first mountain range.  Using the same walnut stain ink I blended in the exposed spots LIGHTER than the first mountain range.  This is what gives the range depth.

I went back to the Chipped Sapphire and this time blended it up from the bottom to meet the mountain range.  To finish it off I blended a small line on the very bottom of the card using Pine Needles to achieve a grass look to the card....something for the moose to stand on!


I removed the moon mask at this point and got my stamps out!
I then used a stamp set from inkadinkadoo and the flying geese stamp and pressed them on the card.


I don't have a moose stamp so I chose to cut a moose silouette from the Give a Hoot Cricut Cartridge and used the shift key to get the base moose (without all the fancy swirl cuts).  I popped him up with pop dots and voila....the card was complete. 

I hope that these instructions help you to recreate this card or inspire you to try one of your own!  Feel free to leave any comments or questions and I'll see if I can help you further!

Until next time,

Happy Crafting!

Thursday, July 26, 2012

Rosetta

Hi my fellow crafters!

Today's blog installment features a scrapbook page that I made for my neice.  I absolutely love it and often wondered why I bought TinkerBell and Friends cricut cartridge but after making this page I know exactly why!


I used the same cartridge to make the title, the flower corner piece and Rosetta herself.  I used my glitter pen to highlight her wings and to add some life to the flowers and stems.  I also used my cuttlebug to emboss the photo mat.

I am working on the next page which will feature Silvermist so stay tuned!

Happy Crafting!


Tuesday, July 17, 2012

My BFF!!!

Wow...what a busy month it has proven to be!  I have hardly had time to breath let alone post on here!  It has been so enjoyable having the kids home for the summer holidays but it definitely ties up much of our time!  Trying to cram in lots of fun stuff before school starts in September.  And this year my oldest starts highschool! 

Part of the summer fun is going to be a trip we are taking out to Nova Scotia.  We're so excited not only for the vacation but for what is waiting for us there.  My BFF!!!  We have been besties since highschool and her husband has been stationed out there as of January this year.  He's a navy man!

So.....since I have been missing her sooooo much and in preperation for our trip I thought I would make a scrapbook page of her.  Because we have been friends for as long as we have I wanted to go back in time a bit and do some older techniques...primarily stitching!!!


Kristina.....you are my best friend and even moving across the country couldn't change that!  I love you to bits and miss you more and can not wait to see you in a few weeks!!!

Thanks for dropping in!

Happy Crafting!

Saturday, June 23, 2012

Birthday Card

Hello everyone and I hope you enjoyed your Saturday!  We went out of town for my hubby's Grandma's birthday......she turns 96 tomorrow! 

This is a quick card that I made for her birthday.  I had already made one very similiar for my best scrappin' buddy so this one was quick to make as I didn't have to think too much!


This card was made by inking up the back ground using the new Peacock Feathers distress ink found in the spring pack.  I LOVE this colour!  I stamped the image using the same colour as well as the sentiment on the bottom of the card.  I did a similar panel on the inside of the card.  The butterfly was made using a stamp and versamark.  Then embossed using white powder.  I also used stardust pens to add some glitter to the flowers and leaves and then a glaze pen to bring out the flower as well as the spaces in the butterfly wings. 

Thanks for checking in and may your days be filled with creativity!  Happy Crafting!

Friday, June 22, 2012

Halloween Layout

Good evening everyone and happy Friday!

I thought I would post a layout that I finished up this week that I thought was super cool.  I'm not much for halloween scrapbooking as my boys are getting out of that age now but I couldn't resist making this one.....


This page was made entirely on my gypsy which is something I had never done before.  I started by using a 12 x 24 mat and started adding elements to it as I would like to see them sized on my pages.  After I had everything all planned out I then created a new layer for each colour that I was going to be using.  From there I just copy and pasted each element onto the appropriate colour tab and voila....the layout was ready to cut.  This really helped out as I was able to just load the mat a few times instead of stopping and starting as I design in my head like I normally would.  I even got the rectangles for the photo mats included on the layout so that I could see exactly what my page would consist of.

I used a few cartridges for this layout.  Much of the halloween elements and house is found on the Happy Hauntings cartridge.  I used Paper Doll dress up for the skeleton and mummy and I used another cartridge (pooh and friends I think) for the clouds.  The moon is just a circle cut from George and Basic Shapes.  I love how this turned out!  I'm sorry the pic is a tad blurry but you get the idea =)

Thanks for stopping in!

Happy Crafting!

Thursday, June 21, 2012

Owl Always Love You

Hi everyone!

I thought I'd post a layout that I made a few weeks ago and stick with the "owl" theme that I seem to be in right now.  This is a super easy and fast layout but I still really loved how it turned out.  It probably helps that it features one of my favouite people on earth...my nephew!


I'm not sure where I got this paper but man oh man do I ever love it!  I thought it was perfect for my wee man.  I think the owl and title were from the Straight from the nest cartridge and the background for the title was a cut from the paper lace cartridge. 

Thanks for stopping in again and happy crafting!

Monday, June 18, 2012

From Owl of Us

Hey fellow bloggers....!

Today I was going through some of the photos of cards I've made and realized that I never posted this adorable owl card.  A fellow co-worker that worked with our company for many years decided it was time to move on and find something else in her life to do.  Known as "the card maker" at work they asked me to whip up something for her that we could all sign and this is what I came up.  I intentionally left the inside fairly "stark" as we had to have a lot of room for signatures and well wishes!


My favourite colour combination I think is pink and brown (really like purple and green too so it might be close).....I did use the Straight from the Nest cricut cartridge for the owl and sentiment on the front of the card.  I also added some embossing on the brown panels.  It was a script cuttle bug folder.  I also cuttle bugged the "OWL" top layer.  I also used my cover-a-card stamp on the white panel on the front of the card using my versamark ink and some UTEE powder to add some texture. 

So there you have my group card.  Hope you enjoyed and until next time.....

Happy Crafting!

Sunday, June 17, 2012

Toy Story Album Finale

Sunday night, the end of the weekend......and the end to my Toy Story Album series.  I've had so much fun sharing this album with all of you and get such a kick out of the comments.

So tonight's final page is very much different than the others.  It's the last page in the album and I thought it would be a great spot for Connor's Dad to write to him a letter to go along with all of the photos in the album.  What a keepsake for Connor when he gets older!


This layout features three of the main characters in Toy story as a border on the bottom and the theme song, "You've got a friend in me" as a title.  I used a lined pattern paper as the background to allow a non-scrapper to write a note to his little man.  Two photo mats for 2x3 photos to finish off the page!

Thank you too everyone who's come to check out this album.  Welcome to the my new followers who joined up during this series.  You can all look forward to a new series coming soon!

I hope you all enjoyed Father's Day and find some time this week for a little creativity!

Happy Crafting!

Saturday, June 16, 2012

Ten days of Toy Story!

Well, here we are at day 10 of the toy story album series and sadly it is the last of the two page layouts!  I can't believe this has flown by so fast!  But it's the first time I've done a series like this and I'm not going to lie....I've had such a blast!  I hope you have too!

So, today I have a layout featuring Woody in all of his western glory.


I played with this layout likely more than any other one in the album.  I just couldn't get it to look the way I wanted to but I am happy with the final result.  This features 3 4x6 photos and one 2x3 photo or journaling spot.  The border was created using a Martha Stewart punch and the die cuts are all part of the Toy Story cricut cartridge.  This Woody character was as large as I could make him using my gypsy and turning him sideways so that I could still cut him on a 12 x 6 mat as I only had the baby bug while making this album.  As you can imagine, the larger the character the easier it is to assemble.

So that's it for double page layouts and only one more single page layout tomorrow.....hope you come back to check out the last page of the album!

Happy Crafting!

Friday, June 15, 2012

Toy Story Album - Day nine

OOPS!!!  I missed posting yesterday!  Every other Thursday I go to card making class on my local craft store and we made some fantastic cards this time.  I'll make some "spin-offs" and post them later......

In the meantime, without further adieu I give you the nineth installment to my Toy Story Album series....


On the left side I have cut Lotso Bear from Toy Story 3 and on the right Hamm......What I wanted to demonstrate on this layout was the back ground.  I used squares cut from all of the scraps that I had from putting the album together.  It was a bright and cheery background that I love, almost quilt like.  I also put the white border around and mitred the corners to give the border a "frame" type look.

This layout allows for 2 4x6 photos and 2 2x3 photos.......this is definitely one of my favs =)

So thanks for dropping by and I look forward to hearing your feedback on this album......Day 10 is a throwback to the western days so I'll see you then!

Happy crafting!

Wednesday, June 13, 2012

Eighth day of Toy Story - Rex

On the eighth day of the toy story, my true love gave to me....ONE Rex layout!


So this layout although cute, was my least favourite in the album and I may even go back and add more to this page.....it just seemed a little blah compared to my other pages.  I figured that one could journal on the white shapes or if you had a longer story you could use the green empty places.  This layout holds 2 4x6 photos and 2 2x3 photos.  Rex was fairly easy to assemble but I found that the teeth were just too tiny to cut and glue into place so I opted to use a white gel pen which I think worked just as well.

Tomorrow's layout features a way to use up some of your scraps and still get a great layout.  Until then, thanks for dropping in and happy crafting!

Tuesday, June 12, 2012

Jesse and Bullseye - Day seven!!!

Lucky number seven......this series is flying by!  I'm going to have to it the craft table soon to get some more work done before I run out of projects to post!

So today I am featuring one of my favourite layouts with Jesse and Bullseye.  It's so fun and vibrant and simple.....but I loved putting it together!


This layout has room for 3 4x6 photos and 3 2x3 photos or you could use one of the photo mats to add some journaling.  Bullseye was surprisingly easy to assemble but Jesse definitely was one of the hardest characters as she has MANY small itsy bitsy pieces to try to adhere.  Note the small white pieces of fringe on her chaps....each a seperate little piece that was cut and had to be glued in place!  Time and patience was in order!  I loved all of the colours used on this layout and can't wait to see someone's photos in place!

Thanks for stopping in and up next I will be having some prehistoric fun!  See you tomorrow and happy crafting!

Monday, June 11, 2012

Day Six - Army Men

Howdy Partners and welcome to day six of my Toy Story Album extravaganza!  If you are just joining in the fun be sure to check the previous five posts so that you get to see all of the fun Toy Story pages.  If you've been following along welcome back!

Today's edition of the blog is so army!  The little army men were soooo much fun to work with!  Not only is this super appropriate for the toy story theme but would make great pages for so many other activities and boy type pages that we all struggle with sometimes.


These guys are also found on the Toy Story cartridge.  I just dug up some "army" types of coloured card stock and some army stripe ribbons and voila, another easy page.  This features 2 places for 4x6 plus 4 places for 2x3 photos or you could use one or more of these spaces for some journalling.  I also thought if you only had a quick sentence or two it could be written on the stripes located at the bottom of the pages.  These army guys were super easy to cut.....two layers.....that's my type of scrapping! 

So there you have it, day six is behind us........please come back for day seven for a super fun and bright layout that you are not going to want to miss!  See you then and happy crafting!!!

Sunday, June 10, 2012

Toy Story Album - Day 5

WOW.....day five already....this series is going by fast!

Today I am featuring a layout designed using Mr and Mrs Potato Head.  I love these characters....Mrs. Potato Head is just so funny!  I love how she is always trying to take care of her hubby. 


I can't quite remember where I got the white shapes from but Storybook cartridge rings a bell and I use that for a lot of these types of shapes.  The circles were just made using a Creative Memories circle punch but you could make them from many various cartridges if you don't have a punch.  This layout is only made for two 4x6 photos but there's room for journalling in some of the yellow border if you chose to.....

Thanks for stopping in and tomorrow I have a great layout featuring the army men.  It's perfect for this themed album or for any boy type layout.  Looking forward to sharing it with you!

See you all tomorrow and happy crafting!

Saturday, June 9, 2012

OOOOOOOOH - Toy Story day 4

OOOOOOOH no!  I missed posting yesterday.  On a whim my family decided to head an hour and a half south of our hometown to the city to watch Men In Black 3D!  We had a great time and the movie was excellent!  Lots of great 3D effects....not sure how age appropriate it is.  My youngest is almost 11 so he was ok but there's some pretty graphic stuff...just a warning!

Now to the good stuff!  Day four of my Toy Story Album highlights a layout that features the little green aliens from the movie.  I always thought these guys were so stinkin' cute!  I loved making this page as I just felt that it was so vibrant which as I'm sure you have discovered if you've been following along, was my goal in making this album.


So this very simple layout allows for one 4x6 photo and three 2x3 photos.  There is a lot of white space on the bottom to allow for journalling if desired.  I think this is perfect for a little boy!  These charactes were very easy to assemble and the title is found on the Toy Story cricut cartridge too. 

Thanks for checking in....and a big WELCOME to my new followers.  I get so excited when I see someone new on here!  Please feel free to share this blog with your crafty friends or put up a link on your blog if you think your followers would also like my work!  I love to share and the more the merrier!

Check back in again tomorrow........The Potato Heads are up next!

Happy Crafting!

Thursday, June 7, 2012

Buzz Lightyear

Good day to all of my scrappin' friends!  Hopefully you have been enjoying the album so far.  Today's edition of my Toy Story extravaganza is a layout featuring Buzz Lightyear!  My favourite character! 


I loved this layout....I love the colours that I got to use...I was lucky to find the perfect green for the highlights on Buzz's suit.  All of the die cuts were made using the Toy Story cricut cartridge.

This layout allows for 2 photos 4x6 and 2 photos 2x3

Thanks for stopping by and happy crafting!

Wednesday, June 6, 2012

Toy Story Album - Day two!

Hey fellow bloggers!

So, day two of the toy story extravaganza features a two page layout that was kept very simple as it is meant for a young boy.  I made both Woody and Jesse on my baby bug (before my CE2 entered my scrappin' life)  I used my gypsy and turned them on the mat so that I was able to make a larger sized character (just a quick tip for people without a larger cricut). 


The title "Let's Play" is also from the toy story cricut cartridge.  The photo mats are for 4x6 photos and 2x3 photos.  When I adhered everything to the page I always left the places that overlap the photo mats without glue so that the photo would be easy to put in place without having to lift elements off of the page.

Hope you enjoy and come back tomorrow to see the next layout featuring Buzz Lightyear!

Happy Crafting!!!!

Tuesday, June 5, 2012

Toy Story Extravaganza!!!!

Hi Crafty Pals!

So earlier this year I posted several layouts featuring the Disney Princesses......it is now time to start showcasing another album that I completed at the same time....Toy Story!  This album was created for my hubby's nephew Connor.....I hope you enjoy.  I'll post a new layout every day until we get to the end!

Here is the title page to the album.  All of the diecuts were pretty much taken from the Cricut Cartridge Toy Story....I think I used Pooh Font for the lettering....it's one of my favourite cricut fonts.....


This frame fits a 4X6 picture in behind it.  I sized it using my gypsy so I could easily see the measurements.  This Woody character was cut at about 4" and I wouldn't recommend doing it any smaller....even this was tough to get some of the small pieces cut properly and put in place.

Thanks for stopping by and be sure to check in tomorrow for the next two page layout of the album!

Happy Crafting!

Monday, June 4, 2012

Using Paper Lace

After much consideration and wondering what I would actually do with it I decided to purchas the Paper Lace cricut cartridge.....once I made a few cuts I quickly saw much potential!!!  Here is a layout that I made using paper lace and I believe that I used Life's a Beach for the flowers and font....100% cricut, that's what I do know!  Hope you enjoy! (yikes...never thought I'd post a pic of me in a swimsuit online...!)  Good thing I love the layout anyhow!

I am going to submit this on http://www.myshericrafts.blogspot.com/ for their summer challenge!!!

Sunday, June 3, 2012

Teacher's Card

So, in playing with my distress inks I decided to try and make a teacher's thank you card to give to my son's teacher at the end of the school year.  I didn't want to do a traditional type card so here's what I came up with.

 Front of the card.....


Inside of the card........


So this card measures 5 1/2" x 4 3/4"
I used my cuttlebug to emboss the flower pattern in the purple mat on the front of the card....
distress colours used
yellow - Squeezed Lemonade (in the new spring colour pack)
pink - Spun Sugar
Purple - Shaded Lilac (in the new spring colour pack)
Black - black soot
Green - Pine Needles
teal (used for the butterfly at the top corner) - Peacock Feathers (in the new spring colour pack)

End of the school year is fast approaching.....time to think about making a card for your teachers!! 

Thanks for stopping in!

Fathers Day Card

Wow....it's been a while since I've posted.....time to get back in the saddle again!  I've been busy with every day life stuff but have managed to still find crafting time and hope the same is true for you! 

With Father's Day approaching I thought it would be good to make a card using some Distress Inks.  Now, I'm not usually one for playing with these inks but have recently become addicted.  I made a how-to video on this card (my first attempt at a video) but haven't mastered the art of uploading it yet as it seems to take FOREVER to upload.....anyone have good tips on how to upload easier?  I tried blogger and youtube....

Anyhow, here is the card.....

Front of the card......

Inside of the card.....


this card measures 6.5" x 4.75" and you need the following materials:

card base - white - 6.5" x 9.5"
2 brown pieces - 6.25" x 4.5"
2 white pieces - 6 1/8" x 4 3/8"
tim holtz distress inks - mustard seed, dried marigold, spiced marmalade
memento - tuxedo black ink
Dad you are amazing stamp - Autumn Leaves - fathers day set
Happy Father's Day - sentiment (not sure what company this is from)
trees - stampin up
bakers twine

I used the blending tool to cover the two white pieces with mustard seed.  Then blended in the dried marigold approximatel 3/4 of the way down the paper and then blended in the spiced marmalade approximately half of the way down.  This created the sunset background that I was trying to achieve. 

The black tree border on the bottom was created by first stamping 1st generation stamps across the paper.  Then by stamping off the first stamp on scratch paper I used 2nd generation stamping to create the lighter trees in the distance.

Mount the sunset onto the brown cardstock and attach to your card.  Repeat the same steps for the inside of your card. 

I am going to enter this into My Sheri Crafts father's day challenge

Thanks for checking in and happy crafting!

Sunday, April 22, 2012

Birthday Cards

Well this weekend we celebrated my Dad's birthday and my only nephew's 3rd birthday.  Loving any opportunity to make a card I sat down at the table and whipped up these two cards....More importantly, I invited one of my NON crafter friends over and introduced her to the wonderful world of cricut.....and now, I have another crafter friend!  Welcome to the crafty side Miruna!  I look forward to many crafty adventures with you!

So here are the two cards I made.....


Tuesday, April 17, 2012

Dopey

Hi everyone!

I just joined a group on facebook for my local area that someone set up....it's a buy/sell and trade site for local crafters to sell items that they don't use anymore etc......  I purchased a punch from a local lady and in trade offered her three Disney Characters of her choice.  She chose Dopey, Bashful and Grumpy dwarfs....

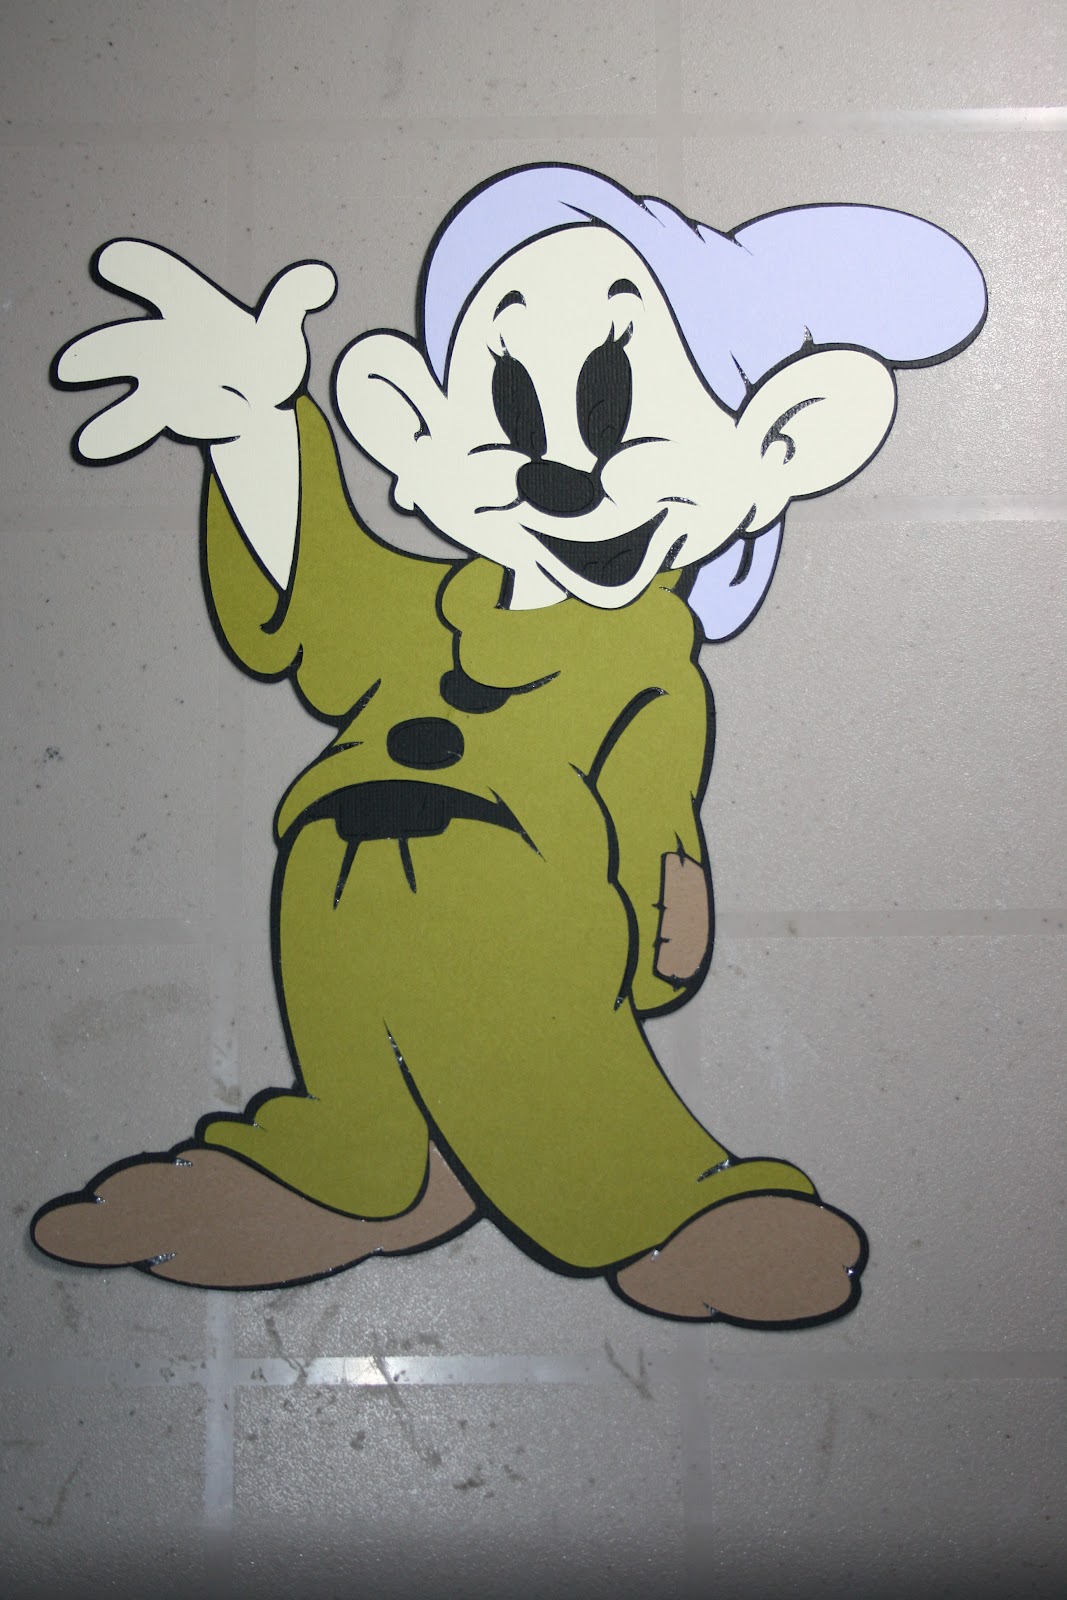
So I got to work tonight and made Dopey.  I got to thinking that I would show you guys how Dopey comes to life and help with understanding the cuts that you have to make....So let's begin...first note: I made this cut from Disney's Happily Ever After Cricut Cartridge and cut him at 11.3 using my gypsy.  He can be found on page 67 of the handbook...


 First cut is the base - no function keys required to make this cut.  It is already slightly larger than the other cuts to allow for a small black outline....


 The Second cut I added was the Layers Flesh/Hair function key and this cut out his face and hands.  This cut will also cut his nose and tongue which I wanted in pink so I used the "hide" feature on my gypsy to not cut it.....


 The I added Dopey's hat using the same function as above - Layers Flesh/Hair but this time used the shift key to cut the upper image in the handbook.....


 Using the Layers Outfit/Outfit function key I then cut out his clothes - this is one single piece....


 Again, using the Layers Outfit/Outfit function key but using the Shift feature I was able to cut Dopey's boots and elbow patch.


 The next cut was the whites of his eyes which is found using the function key Layers White/Extra....a good note here is that the larger you cut your image the easier these next few cuts are....the finer details become difficult the smaller they are......When I make smaller versions I usually use a white gel pen for the whites of eyes and then a marker for the eye colour....


 Here I have added the blue in Dopey's eyes.  This cut comes from the Whites/Extra function button in addition to the shift key.  Again this cut also makes the buttons and belt buckle but because I wanted them in a different colour I hid them using my gypsy.  If you don't have a gypsy you would just have to make the entire cut in both colours and discard the pieces you don't use.....


 Here I added the buttons and belt buckle.....see the above comments as it is the same exact keys..


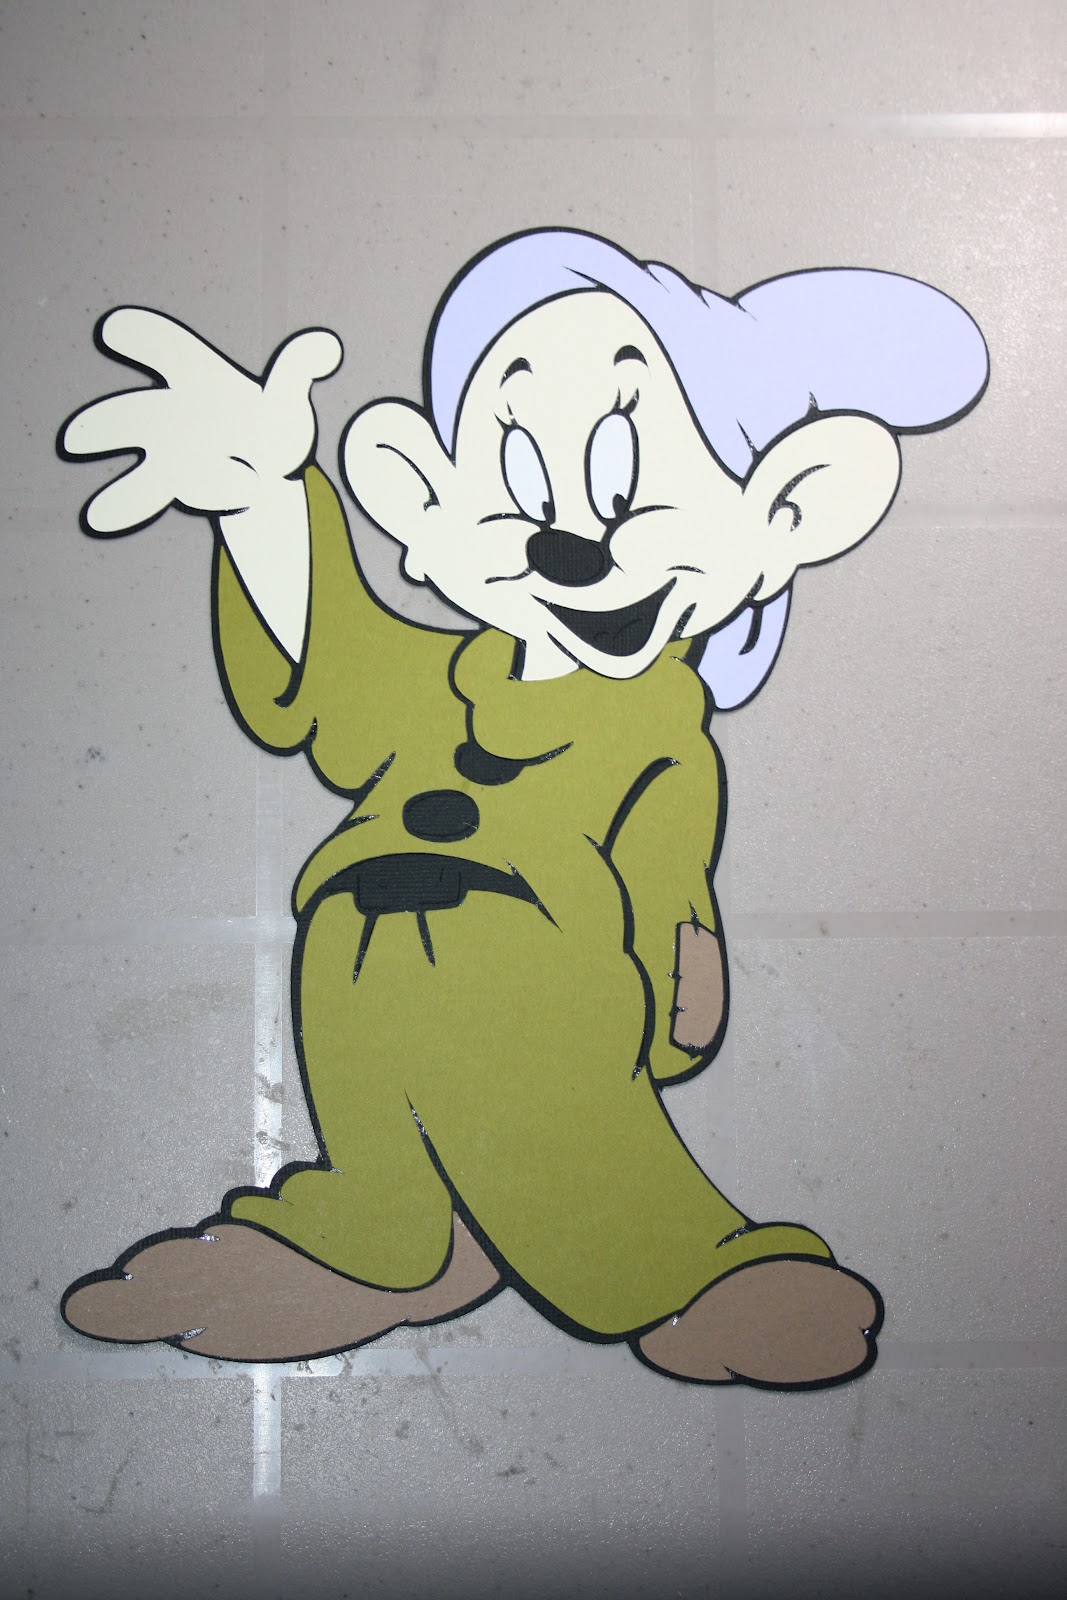
 And I went back and cut Dopey's nose and tongue using the Flesh/Hair function key but this time using my gypsy I hid the hands and face cuts so that it only cut the parts I wanted.....I love my gypsy!


And Voila......Dopey is complete.  I put a ruler beside him so that you could get a feel for how large he really turned out.  I absolutely love him and hope that the lady who wanted him does too!

Hope you find this helpful....the Disney cartridges are sooooo super cute!  A little time consuming....it took me about 45 minutes to make this cut from start to finish.  Have a fantastic day!